Saturday, December 23, 2023

Rattle Can Rebuild Part 4


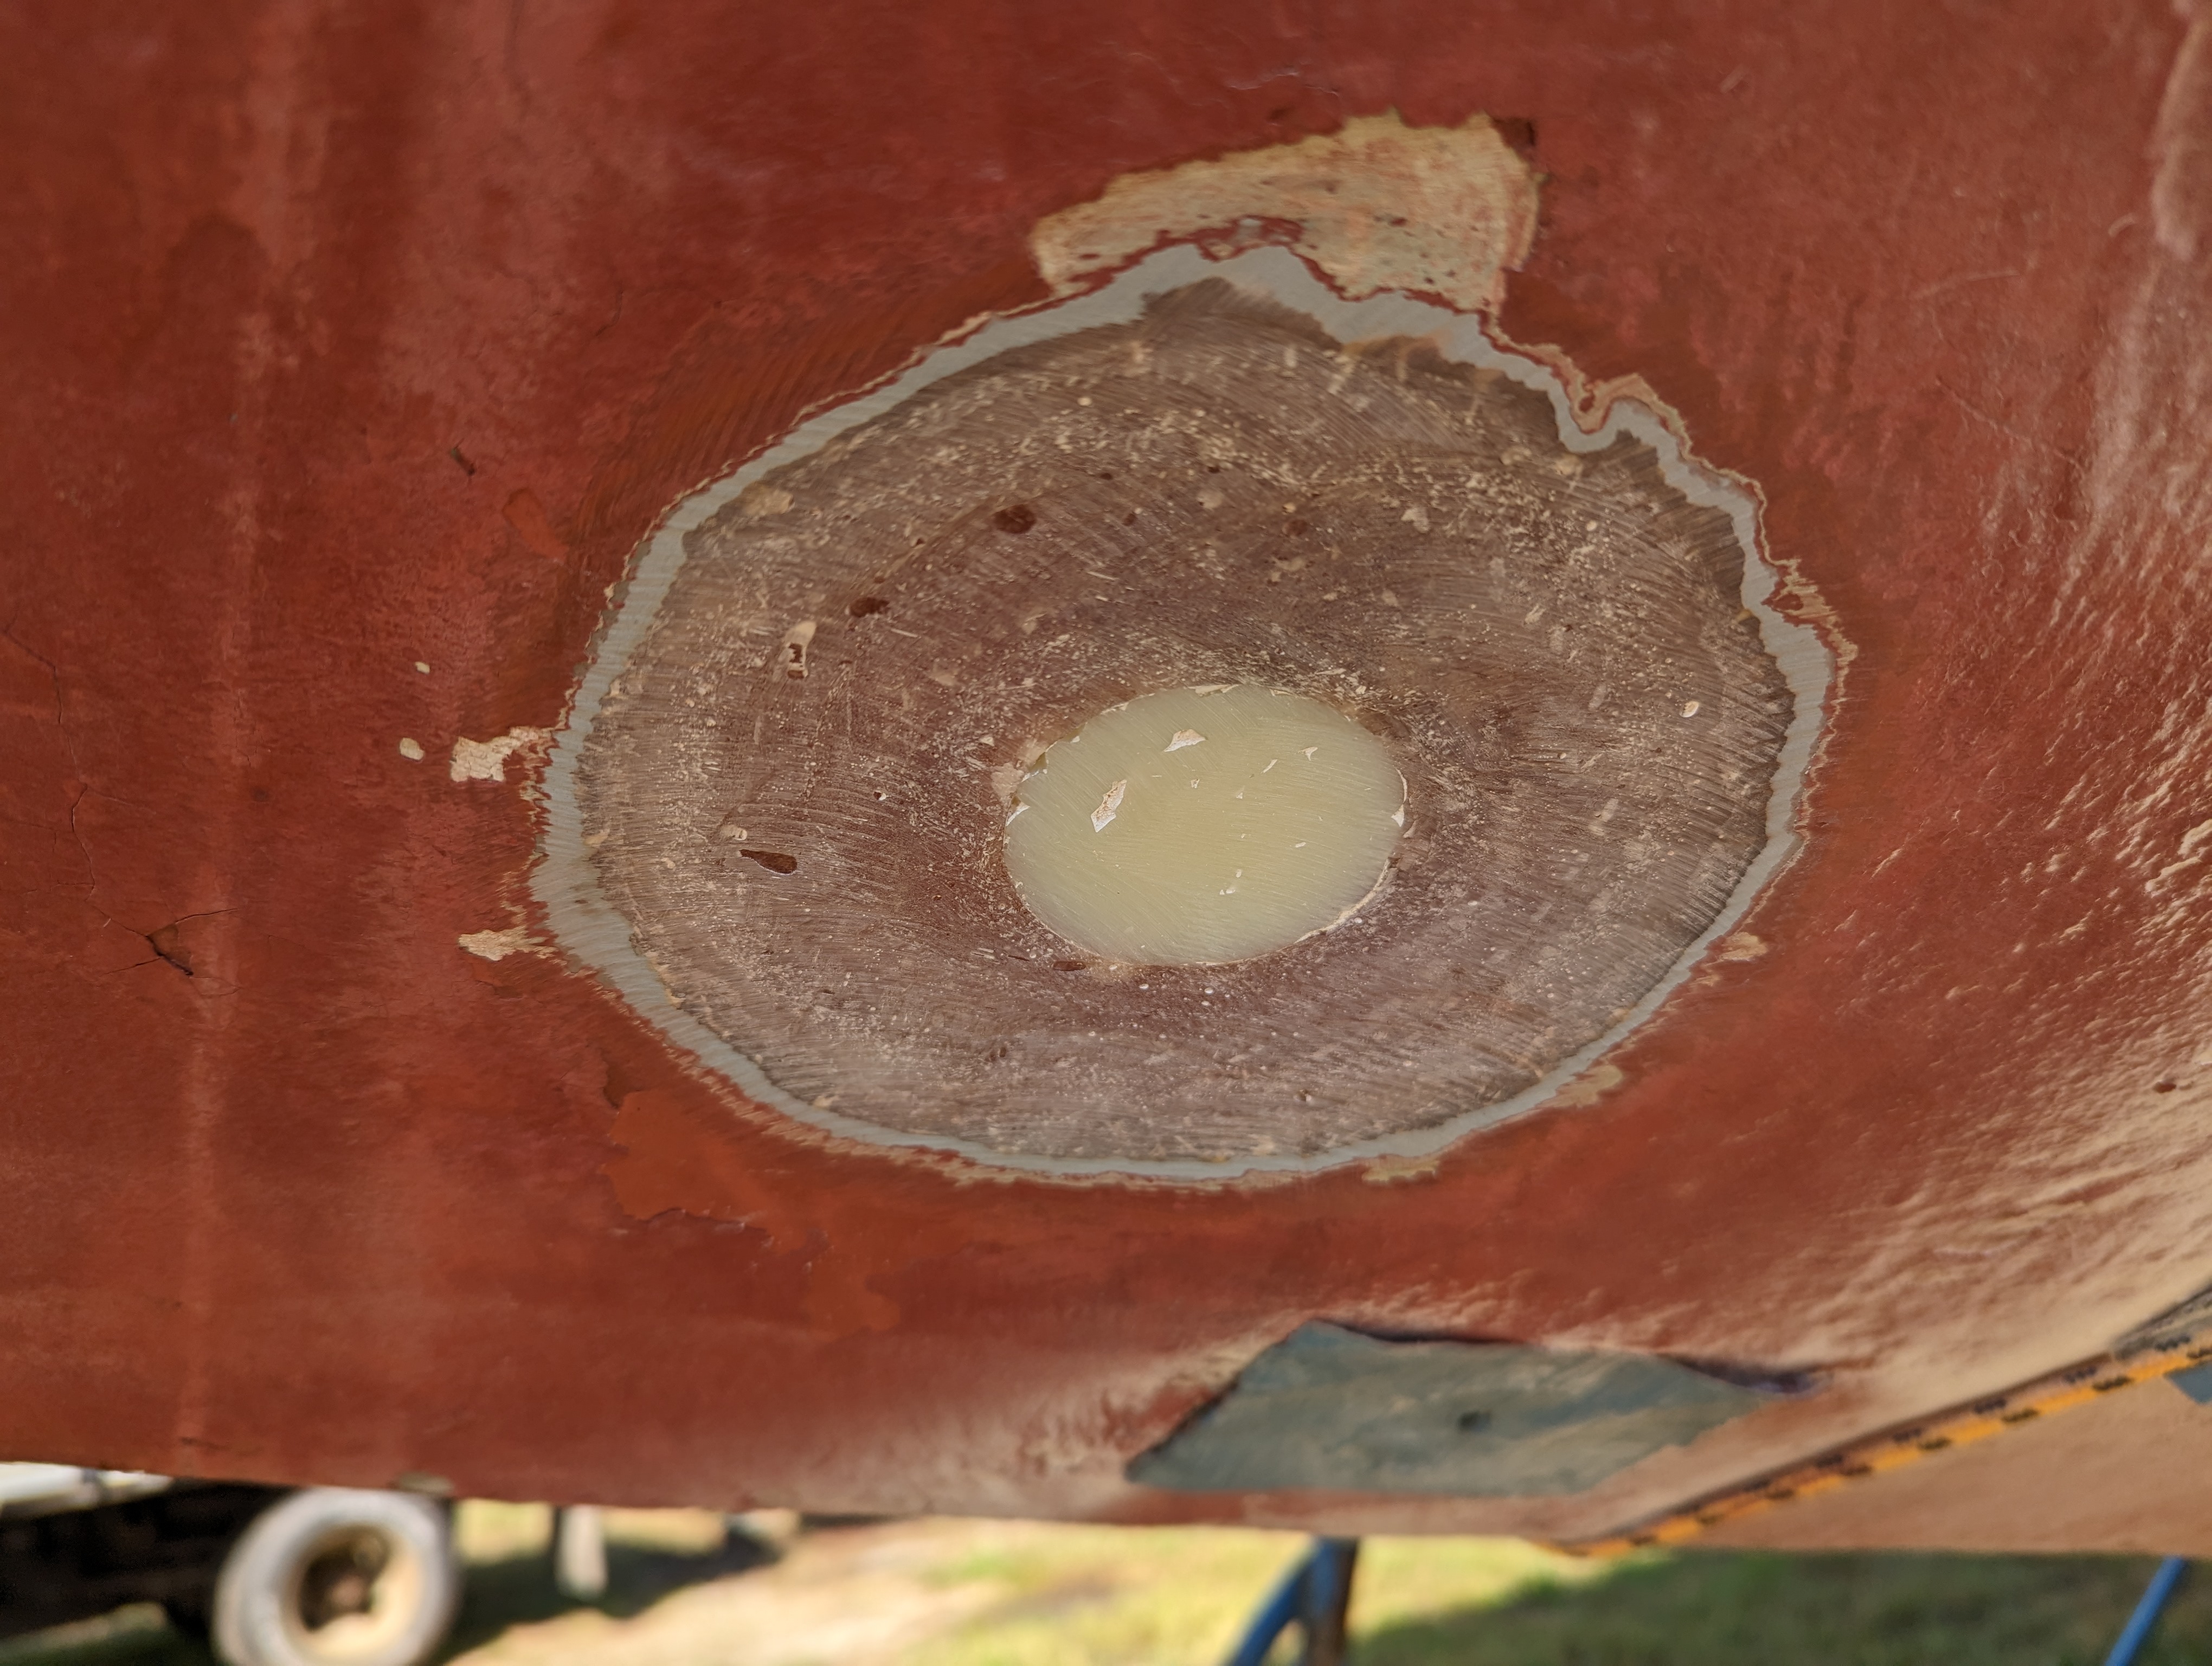
 As I go through the engine I'm looking for things that don't look right and it didn't take me long to find something.  The picture above is the raw water pump drive gear.  Basically, it's a gear that's driven off the crankshaft through a series of gears in the timing case and the slot in the middle is where the water pump impeller shaft inserts into.  The arrows in the picture show where the slot is gouged or worn from the water pump impeller shaft hitting it.  I'm not sure why this happened, but maybe it's normal wear for an engine with 974 hours.  

Fortunately, I have a new drive gear and bearing set, but I wasn't sure how to get at it.  The Westerbeke W27 schematic indicates that it is accessed by removing the timing case (or at least I thought it did).  The timing case is not something I want to get into, because in order to take it off, the govenor spring needs to be disconnected from the high pressure injection pump and it's accessed through a small plate on the side of the engine.  The manual states several CAUTIONS about how fiddly this is and if you drop the spring, you are screwed.  I'm certainly not a diesel mechanic, and warnings like that scare me.

I did a bunch of googling and forum posts asking around about how to get at the drive gear and because each engine does things a bit differently, I got a bunch of opinions that were all over the place.  Finally, I emailed the picture above to Hansen Marine Engineering and asked 1. Is this bad, 2. If so, how do I replace it.  Fortunately, they got back to me within a day and said this is a common problem and it should be replaced, but to do so simply requires removing the bearing housing that the raw water pump bolts to.  Yay, no timing cover removal!

With my newfound knowledge, I got to work and unbolted the bearing housing and within 5 minutes I had the old gear in hand.  To reinstall, I just had to seat the 2 interference fit bearings on either side of the gear.  Of course, you can just drop them on, they have to be pressed on.  I didn't really want to take it to a shop and I didn't want to hammer them on (and risk screwing up the bearings) so I tried a fun trick that I had used before when putting bearings on my tractor mowing deck spindle.

I put the gear in the freezer overnight and the next morning I heated up the oven to 275F and put the bearings in for an hour.  The theory is that the shaft of the drive gear will shrink slightly in the cold and the bearing races will expand with the heat.  Once everything was sufficiently hot and cold, I pulled the gear from the freezer and the bearings from the oven and with a hot mitt slipped them on.  One side slid on with little effort and the other side took a few taps from a plastic mallet on the inner race but it worked and once the temps equalized, the bearing were tightly fitted onto the gear. 

Now that the bearing and gear assembly was all together, reinstallation was just a matter of reinserting the gear and bearing housing assembly into the back of the timing case and bolting it back on with a gasket.  Super simple, but a lot of hand wringing along the way.  I might just become a diesel mechanic yet!

Next up, I assembled the actual raw water pump which consists of a housing (part #048080), the impeller shaft, 2 bearings, and a series of seals and washers to keep everything watertight.  Fortunately, the schematic is very good for this assembly so it wasn't difficult.  I still have to paint the pump housing, but once that's done I can bolt it onto the drive gear housing and call it a day.


Monday, December 18, 2023

Rattle Can Rebuild Part 3

As I said in a previous post, I'm probably doing this all backwards by starting at the bottom of the engine and working up, but I've made my bed and I'll be sleeping in it...  So, starting at the very bottom I began by pulling off the oil pan which showed some signs of leaking around the gasket.  Additionally, there was some rust on the bottom that I wanted to take care of before it got bad enough to leak.  

Fortunately, I didn't have a single one of the 17 oil pan bolts give me a hard time and they all came out without much of a fuss.  Getting the pan itself off was a bit of a challenge since it had probably been in place for close to 40 years.  Because the pan is sheet metal, I had to take care when getting it off so I took a 5" spackle knife and gently hammered it between the block and the pan around the whole perimeter.  I left a few bolts loosely in place in case it popped off too quickly for me to catch it.  Overall it wasn't too bad and took about 15 minutes to free it up.  The bottom of the pan had the last remnants of oil in it and I was pleased to see that I didn't find any metal shavings or anything but oil for that matter.

Once I had it off I cleaned up both mating surfaces with a razor blade and brake cleaner and had both surfaces nice and smooth within a half hour.  Next I removed the oil extraction hose and fitting and sanded the pan down and degreased the whole thing with more brake cleaner.  I'm sure it is toxic stuff, but brake cleaner does wonders on grease and grime.

Once everything was cleaned and prepped, I shot 3 coats of VHT high temp engine enamel primer and let it cure. The next day I did 3 coats of VHT high temp engine enamel.  I decided against using OEM Westerbeke red because:

  1. I had the VHT on hand and new cans (Chevy-Orange) are $18 at pretty much any auto parts store on the planet and are pretty close to Westerbeke Red
  2. OEM Westerbeke Red is $60 a can. The markup is insane and not worth it IMHO.
I gave the paint a few days to dry and cure and then installed a new banjo fitting and extractor hose to complete the job.  I also ordered new oil pan bolts from Westerbeke; for some reason their bolt prices are not quite as high as many of their other parts (probably because the same type can be purchased locally. I went with Westerbeke on this purchase because I didn't have to fiddle with pitch and size and could just click order; knowing that I would get exactly what I needed.

While I was waiting for parts to show up and paint to cure, I pulled off a bunch of other lower engine parts and cleaned up the block.  There was quite a bit of surface rust and took a wire wheel, steel brush and picks to clean it up. Once again, I followed up with a liberal dousing of brake cleaner and lots and lots of shop towels,   I went over it several times before I was satisfied that it was good enough.  

At this point I turned the rattle cans toward the engine and shot 3 coats of primer on the block and let that dry/cure overnight.  The next morning I went back and did 3 coats of Chevy-Orange to finish it all up. I let that cure overnight and then bolted the oil pan back in place along with one of the engine mounts that I had taken off and painted a few days before. To make sure the new gasket didn't slip while putting the pan back on, I put a thin layer of Permatex #2 on the pan and let it tack up before applying the gasket. I also coated each bolt in marine grade anti-sieze and torqued everything to spec. (I believe the oil pan bolts were 13mm with a torque spec of 57-64 ft/lbs).  Finally, I followed up with a quick wipe down of the bolts to remove any anti-sieze squeezeout and some paint to protect the bolt heads. 


Thursday, December 14, 2023

Rattle Can Rebuild Part 2

With the engine setup in the stand in my shop, I started tearing it down as much as I dared, taking lots of pictures along the way.  I have both the service manual and parts schematic on hand but the photos will really tie it all together once I started building it back up. 

The first order of business aside from photo documentation of all angles of the engine was to assess the condition.  Even though it only has 974 hours, it has been sitting in a garage for many years and there was a fair amount of rust, dirt, and chipped paint on the lower half.  I cleaned up as much as I could with a stiff wire brush and then hit all of the nuts and bolts with a liberal dose of PB Blaster to hopefully loosen up any rust that would prevent their removal.  


Somewhere along the way I decided to split the rebuild into 2 parts, mainly because of my fear of keeping the engine cantelevered on the bell housing in the stand and potentially cracking or deforming the housing (even though I keep the chain hoist tensioned).  The first part would be to get all the lower parts cleaned up, replaced, and painted and then move the engine back into the rolling dolly where it sits on its mounts.  The second part of the rebuild would be to do the same to the top half of the engine.  I'm probably doing it backwards because when I re-do the top half I'll get the bottom dirty again by virtue of gravity, but it is what it is, and I'll try to be careful and neat.

Along the way I found the following issues to address:

  • Fresh water cooling pump - appeared to have been leaking. Replace
  • Raw water pump drive gear - the slot where the water pump mates into is deformed. Replace
  • Front engine mounting bracket -  just all janky with rust. Clean and paint
  • Bottom of engine block - more janky rust. Clean and paint
  • Oil pan - leaky around the seal and want to replace the drain hose. Replace hose, clean and paint
  • Rear main seal - evidence of an oil leak behind the flywheel. Replace

The good news is that I think I have all the parts I need, but I've never dug this deep into a diesel before so I'm sure I'll be learning a lot along the way.  

Anyway, after letting all the bolts soak in PB Blaster for a few days I got started and removed the fresh water cooling pump.  I was able to crack the bolts without issue and had the pump off in a few minutes. However, when I looked into the hole behind the pump (inside the cylinder jacket) I could see a lot of rusty scale and old antifreeze sludge. Not good. I needed to get that all cleaned out before I put the new pump and cooling system back on because I don't want that circulating through the system.  Additionally, the rusty scale on the cylinder jacket probably keeps the engine from efficiently cooling.

I did some research and took a trip to the autoparts store and picked up a gallon of Evaporust. This is a chelating agent that basically bonds to rust and scale and puts it in solution.  I cut a piece of plexiglass, drilled bolt holes in to match the pump pattern and bolted it onto the engine where the pump used to fit.  Then I pulled off the thermostat housing (highest point of the fresh water cooling system in the engine) and poured Evaporust in until it filled up to the top and let it soak.

After two days, I pulled the petcock off the lower end of the engine and drained it all out. The result was pretty amazing (and disgusting).  I couldn't see any more rust and scale and all the sludge had miraculously disappeared.  The almost clear Evaporust solution that I had initially poured in was now a chunky jet black color.  I may have created a hazardous waste problem, but at least the inside of the engine is now clean.  I'll flush it all again once I have it put back together, but I'm pretty happy with the result. 


Sunday, December 3, 2023

Rattle Can Rebuild Part 1


Now that it's too cold to actually work on the boat effectively, I've turned my attention to the dreaded engine project.  I've had a love/hate relationship with inboard marine engines over the years, beginning in the 1980's when my dad had a boat with a Westerbeke W13. My dad had zero ability when it came to solving engine issues and left me in charge of making sure they worked.  The W13 was brand new and really didn't need anything but periodic maintenance, but we moved on to another boat with a Yanmar 3GM30 that was a bit long in the tooth and I was forced to spend a lot of quality time in uncomfortable positions trying to diagnose and fix issues along the way.  None of this put me off though because I always managed to find a solution and these small diesels were pretty reliable despite the hostile environment they lived in.  

It wasn't until we purchased a wreck of a boat (Pearson Ariel) with an Atomic 4 that almost never ran.  The good news was that it forced me to become a better sailor, the bad news was that it was always threatening to blow up (gasoline, not diesel) when the carburetor float would stick, overflow the bowl and start pouring into the bilge.  Even though it was the simplest inboard engine I've had, I never got comfortable with it and the boat didn't last very long.  

Since then, I've had a Westerbeke W21 that was super reliable, but prone to overheating because the old heat exchange had too much corrosion in it.  I pulled that apart several times fruitlessly attempting to clean out the heat exchanger and it wasn't until I was re-coring the decks on the Alberg 35 that I solved the issue by soaking it in some sort of acid solution for 2 weeks.  

As a result of my engine experiences over the years I have become somewhat distrustful of these beasts and the latest version (Westerbeke W27) is no exception,  However, I'm determined to get over this by tearing the engine down as much as I can so that I can understand exactly how it ticks.  I'm not going to open up the head because the compression tests prior and survey done prior to me buying the boat indicated no issues and it only has 974 hours on it (which is just a baby by diesel standards that routinely run for 5000 hours without a major rebuild).

The fun part of this project is that I have just about all new OEM parts and I will be replacing all the old parts with new ones (whether they are needed or not).  The big exception is the exhaust manifold which is no longer manufactured so I will be rebuilding that.  In addition to that, I'll be stripping down the engine as much as possible so I can repaint the block and get ahead of rust.

So, the existing engine cradle is pretty nice, but it's low to the ground and I can't access the oil pan and other low parts on the engine.  As a result, before I began any real work on the engine, I decided to get it mounted on an engine stand so I could get to the bottom parts of the engine.  

I ordered a chain hoist and engine stand from Amazon and shored up the shop ceiling joists with a 4x6 beam to carry the engine weight on the hoist and then lifted it up onto the stand.  Pretty easy to do, but a bit scary knowing that 430lbs could drop on my foot at any moment.  I was a little worried about cantelevering all the weight on the bell housing so even though it's mounted on the stand, I still keep the chain hoist hooked up so I don't put too much pressure on the bell housing.  

Now that i'ts mounted and everything accessible, the project can really begin. Stay tuned...


Thursday, November 9, 2023

Winter is Here

The high temperature yesterday was 39 degrees and I'm slowly coming to the realization that winter is indeed on the way, and I have to wind down the 'on the boat' projects for the year.  I woke up this morning to 2 inches of snow, so it's definitely time.  I'll be starting up on the engine rebuild in a few weeks, but because I am obessed with ticking the projects off the list I decided to tackle one more project this past week before the snow came

Previously, I had installed the head and associated plumbing, but I never quite finished up the raw water seacock connection knowing that I was going to be 'teeing' in a line for the washdown pump.  So, with that in mind, I decided that I would continue work on that seacock and install the washdown pump (Johnson 54535 AquaJet 3.5) off of it at the tee. I also needed to connect the strainer to the head intake on the other side of the tee and get it all connected up to the raw water seacock.

I knew that I was going to mount the washdown pump under the v-berth in one of the compartments forward of the holding tank but it took quite a bit of time and thought to decide on the final location. Everything on a boat is a tradeoff; if you mount everything in the most accesible locations then you have no room for storage once it's all back together.  On the other hand, you don't want to install something that may need service in a place you cannot possible get at easily.  This particular pump has a strainer mounted on it that will need to be serviced from time to time to clean it out so I tried to make it as accessible as possible without making the compartment unusable for storage.  

I ended up tucking the pump under the aft end of the compartment opening so it wouldn't be in the way, but I could still access the strainer.  It's not really even the pump that I'm worried about interfering with storage, it's the inlet and outlet hoses that I don't want to get in the way.  Mounting the pump required the usual 'I need 3 hands but I only have 2' sort of situation and I somehow managed to sit on my glasses and break the frame while doing it.  However, in the end, I think it's a good location and I took quite a bit of care to secure the hoses well and get them out of the way.  

The seacock side of things had much better access and I think the installation looks solid and the strainer going to the head will be very accessible right under the head compartment sole.  I still have to run the wires from the pump and tank monitor (installed the week before) to the distribution panel, but I'm going to tackle that next spring when I label the existing wiring and replace the panel. In the meantime, I'll be cleaning things up and removing my tools for the winter and start preparing for the engine rebuild.  I'm really happy with how far I've gotten so far and I haven't found anything that scares me yet, but I'm sure that will come with the engine project.


Tuesday, October 24, 2023

Getting A-Head


The weather has mostly held out so far so I was able to keep pushing on the sanitation system installation task.  The new toilet is a Raritan Superflush which I believe has the same pump assembly as the highly rated Raritan PHII that has been around for a long time.  The main difference that I can see is that the base is slightly different on the superflush and will not accomodate an electric head.  Since I have no interest in an electtric head and sold the new in box electric head that came with the boat, I don't think this will be a problem.  Marine sanitation systems have caused me great problems over the years (Nasty Example) and the last thing I want to do is make things more complicated.  The new system will be as simple as possible, but still legal (and not a composting head).  

The first thing I found with the new toilet was that the bolt pattern didn't match up and 2 of the backing nuts would be located in a totally inaccessible area without cutting away some of the fiberglass pan in the head.  So I decided to cut a piece of plywood that would fit on top of the existing pan and install recessed tee nuts on the bottom so I could wouldn't have to deal with trying to spin a nut on.  Once I cut out the shape on the plywood, I marked the location of the head mounting bolts and tapped and recessed where the tee nuts would be located before encapsulating the whole thing in epoxy followed by 3 coats of Kirby paint.  I know it's going to be wet in there so the epoxy coating should keep the wood from getting saturated.

While I was waiting for the paint to dry I started plumbing the hoses, vented loops, and the lockable y-valve to divert the head discharge to either the holding tank or overboard.  The only thing to say about this is that the 1-1/2" Trident Premium sanitation hose is tough to bend and hard to wrestle through bulkheads.  The raw water hoses (3/4") were quite a bit easier to work with, but the cramped quarters made everything a challenge and took much longer than expected.  I made sure that the hose runs had no low spots where sewage could sit and made the runs as short as possible.  I also did a vented loop for the toilet discharge (before the y-valve) and for the raw water (between pump and where it enters the toilet).

I waited for a few days for the paint to dry and then stuck the new platform in place with 3M 5200 and moutned the toilet.  I left the hose connections to the toilet that I had previously installed a bit long so I could measure and cut them accurately once the toilet was bolted in place.  The final piece of the installation was to mount the Scad Tank Monitor to the holding tank and install the display next to the outlet in the head.  I still have to run the connection to the breaker panel, and will need to fasten the hoses with zip ties, but probably won't get to that until I tackle the electrical system.  I'm happy with the result and think the install will be serviceable in the future.


Sunday, October 15, 2023

Fall Projects Completed, Might Just Have Time for One More

When I bought the boat at the end of August, I had a rough plan of what I wanted to get done before it got too cold.  Of course, just getting the boat tucked away with a good cover was a project in itself, but I really wanted to get some actual progress on the refit.  I know this is a long term project that will last until Spring of 2025 (that's the plan now at least), but tangible results are key to keeping motivation over the winter (I'll be rebuilding the engine this winter in my shop).

Despite the many contortionist positions I've folded into while doing work aboard the boat so far, I'm really loving this refit so far.  Obviously, there are frustrations along the way, but compared to the Alberg 35 I restored, this is mostly a pleasant experience so far (read: grinding decks off is bad, installing systems on a clean boat is good).

Anyway, the projects on my list seemed simple enough: paint the bilges and install the seacocks, but as with any boat projects, even the most innocuous task can be challenging. Fortunately, the biggest challenge with painting the bilges was moving stuff around and crawling into corners with a respirator.  Now that it's all done, I will say that the bilges look amazing.  I've never had a boat with bilges that clean and shiny and I'm not sure why my wife isn't as excited as I am when I show her the photos of my work for the day.

The seacocks on the other hand were not as simple as I thought. I've installed seacocks before, but they were direct replacements, but several of the seacocks on Velorum were different makes and sizes from the originals. So, as in my previous post with the transducer, some surgery was required.  The last two I had to install were the drain for the head sink and the engine raw water intake.

The raw water intake was a 1" (original was 3/4") so I had to enlarge the hole in the hull, which was pretty straight forward, but the real problem was that the new seacock (Forespar Engine Flush) was much wider than the original and I needed to cut away some fiberglass liner to give me enough room to spin on the seacock to the new backing plate and through hull fitting.  The head sink drain was the same size (1"), but similar to the raw water intake, I needed to do some surgery to the surrounding fiberglass liner to be able to screw on the seacock.  All in all I ended up doing a lot of head scratching trying to figure out the best solution, but I'm happy with the end result.  

So even though I've finished what I had planned for this fall, the weather has been pretty good and I've started installing the sanitation system. I posted about the holding tank install a few weeks ago, but I think I have time to get the rest of the system installed and hooked up before the weather really turns. Stay tuned.


Monday, October 9, 2023

Boat Yoga and Lost Time

I took last Friday afternoon off in the hopes of wrapping up a bunch of the 'Before it gets too cold' projectts and ended up making a mess and not really getting much done.  With the rain on Saturday and family commitments on Sunday, I really only had the time to get back to were I should have been Friday afternoon.  Oh well.

My plan on Friday was to get the Airmar B60-20 depth transducer installed along with a bunch more bilge painting. The old depth transducer was something smaller than the 2-3/8" hole I needed for the new one and if you've ever had to overdrill an old hole with a holesaw, you know it can be a challenge.  I had a cool trick that I had heard about and wanted to try; just bang a piece of scrap wood into the old hole and then mark the center.  Once you have the center, you can use the pilot bit in the larger diameter holesaw to drill the center and guide the bit.  

I was really pleased that it worked really well and thought I was well on my way to getting a ton done for the day.  I dry fitted the new transducer, but didn't snug down the nut.  My son came over to help and we slathered up the transducer with 3M 4200 and fitted it in.  I started tightening the nut and it became increasingly difficult to turn with the sealant in the threads so we decided we needed to get 2 wrenches on it (one to keep it from turning in the hole and the other to tighten the nut).  Unfortunately, the location of the through hull is under the vberth, and while I can get a hand on it easily, getting 2 on is nearly impossible. There is a second opening from above and my son was able to reach down and just barely hold onto one of the wrenches while I somehow manage to get 1 arm and both my shoulders through a very small opening.  

After much grunting and lots of choice words when the wrench would slip and my knuckles would smash into jagged bulkhead corner I got it as tight as I could.  To my horror though, I could still wiggle the transducer in the hole and there was a noticeable gap in the center.  So, when I decided I didn't need to snug down the nut when test fitting without sealant, I didn't notice that there was a slight curve to the hull there and it was not flat, so no matter how tight I got it, it would never seal properly. Uggh.

So we reversed the procedure complete with lots more choice words directed at all manner of things and pulled the transducer.  At that point we were 3 hours into the job and decided that it was time to cut our losses and call it a day.  We went home and I spent the night cleaning the transducer threads with a toothpick and a wire brush. What a fun Friday night!

Over the course of the weekend, I came up with a solution and once again, a donut came to the rescue (is there anything they can't do?).  This particular donut was a 1/2" G10 plate that I drilled a 2-3/8" hole and shaped to match the interior of the hull.  There was a lot of test fits before I was satisfied that it sit perfectly flat on the curve of the hull.  Then I test fitted the tranducer and was able to snug the nut down very tight with no gaps.  I epoxied the donut to the hull and let it cure overnight. When I came back in the morning, I was able to give it a quick sand to clean up any little globs and then refit the tranducer just to make sure.  Finally, we re-bedded it with another round of 3M 4200 and it snugged down perfectly with very little effort.  A lot of effort for one through hull, but I'm now certain it is very secure and will not give me any trouble in the future.

Mmmmm, donut

Finally a snug dry fit

The finished product


Tuesday, October 3, 2023

Lots of Little Things

I know I'm working on borrowed time right now and I'm trying to take advantage of the warm weather while it lasts knowing full well that the cold is on the way and direct work on the boat will come to an end soon. Over the winter I'll be rebuilding the Westerbeke 27 in the relative warmth of my shop, but for now I have to focus on the million little things that I want to get wrapped up.

When I bought the boat a little over a month ago, I put together a list of things I wanted to get completed before the cold sets in, and I'm happy to report that I think I'll be able to complete all of the tasks I set out to do plus a few more.  Over the past week I've spent time on the following jobs:

1. Seacock Installation: I dry fitted each seacock and backing plate multiple times, rehearsing for the actual install that using 3M 5200 sealant. This is kind of a holy war in boating circles. Many use 4200 which isn't as permanent, but new chemical techniques allow for removal of parts that have been sealed with 5200 so it isn't totally destructive, and 5200 has never failed for me before when applied correctly.

Before we even started dry fitting the seacocks, my son and I sanded down all the through hulls to get old paint and sealant out of the holes.  Next we dry fitted each seacock multiple times to make sure they would snug down properly.  In several cases we had to do some additional sanding inside and outside of the hull to make the flush fit through hulls seat properly. Once we were finally satisfied with the fit, we went to work on the messy job of actually gooping up the through hull fittings and installing the seacocks on the inside of the hull. 

In most cases we were able to apply the 5200 and insert the fitting into the hull while someone on the inside screwed the seacock on. Once hand tight, we cranked them down by inserting a piece of wood into the through hull fitting while the person inside really put their back into tightening the seacock.  After that, we did a rough cleanup and let the curing begin.  So far we've completed three of the five seacocks.  I'm waiting on through hull fittings for the final two that I ordered last week.

2. Install Scupper and Deck Hoses: One of the first jobs I did when the boat arrived was to install the above waterline through hull fittings for the scupper and deck drains.  Given that the boat is well covered and dry, I wasn't worried about things getting wet down below so I hadn't circled back to installing the hoses for them until this week.  This didn't take particularly long, but involved some interesting 'boat yoga' to access some of the hose runs and wiggle them onto the fittings. The hardest part was bending the heavy 1.5" sanitation hose through holes and around corners. I opted for using this for the deck drains because they travel through some electrically sensitive areas in the boat and I wanted something that would last.  For the cockpit scuppers I used standard smooth walled bilge hose (1.5").  I still have to add a few hose clamps to double up every connection, but I can check this job off the list.

3. Install and Secure Holding Tank: This job was not on my list of to-dos for this year, but when I got
into the vberth area to paint I decided it wouldn't be much additional work to get this done while I was in there.  The previous holding tank was a slightly different size than the new one and I needed to build a frame to support and hold down the new tank.  I started by painting the locker under the vberth where the tank will reside.  I let that dry for a day and then went back and built out a support frame that I also painted and then installed four stainless steel hold downs for straps that I ordered.  I finally got the whole thing installed last night and I'm pleased that the hold down straps keep the tank absolutely still, so I don't expect the tank to be bouncing around when pounding into headseas.


Monday, September 25, 2023

Too Many Holes

I don't like boat holes, especially the ones below the waterline.  I'm not particularly good about servicing seacocks and as a result, I have had a number of them sieze up on me over the years.  The Marelon plastic seacocks are a bit better than bronze because they don't corrode and generally don't need much in the way of servicing so I appreciate that the new seacocks for the boat are Forespar Marelon, but I still don't like the idea of so many holes below the waterline.  

When I was looking at the boat before purchase I was struck by how many below the waterline openings there were.  My last 35' boat originally had 5 seacocks and I reduced that to 3 after the refit.  I was able to eliminate 2 because I switched to a composting head.  Velorum, on the other hand had 6 seacock openings (no seacocks are currently installed) and 2 instrument holes and it looked like swiss cheese.

After identifying what each hole was for, I determined that I didn't need one of the 1.5" seacocks up under the v-berth.  This particular hole was intended for a holding tank offshore discharge via a macerator pump and I just don't plan on dumping the tank offshore and will rely on either direct discharge if offshore or use a pumpout facility (boats and shoreside pumpouts are available in most harbors on the east coast these days).  I'll go into detail about the sanitation system later this year (I hope to get to it this year). 

Exposed balsa, not good
Another problem I found with this particular seacock was that it was the only through hull (above or below the waterline) that went through balsa core.  Hinterholler Yachts were pioneers in balsa cored hulls and they took great care with through hulls and made sure they went through solid glass. The one I'm eliminating was probably not a factory install because it goes right through balsa and it was not isolated with epoxy.  The only thing keeping the water out was a thin coating of sealant.  Fortunately, the core wasn't damaged, but that had to go.

Closing up a through hull is pretty straight forward when it's solid glass, but it gets a little more complicated with a balsa core.  The first thing that has to be done is to get rid of the core surrounding the opening.  I used a combination of an oscillating saw and a drill with a an allen key in the chuck to dig out the core between the outside and inside layers of glass.  Once that's complete the process follows what one does when closing up a through hull on a solid glass hull (12:1 bevel) except the bevel only goes as deep as the outer sking (in this case about 3/16") and the hollowed out core is filled with thickened epoxy before the outer skin is reapplied.

I cut out 4 layers of 1708 biaxial fiberglass and mixed up a small batch of laminating epoxy and layed them into the beveled recess where the hole once was and covered it with release plastic sheeting and painters tape to keep it in place until it cured.  Finally, I applied a thin layer of fairing compound to get a smooth surface after sanding.  Probably easier explained in photos below, but it's done now and time to move on to painting under the v-berth (where the through hull was located).

Core removed and bevel complete

Core filled with thickened epoxy

A layer of biaxial glass applied over the filled hole on the inside

4 layers of biaxial fabric
Fairing compound added

Faired and ready to go